
Troubleshooting Support
The most common call we receive is: My milk machine does not have enough pressure, what is wrong?
Most problems are a result of vacuum leaks. Most of the time the vacuum leak is due to missing gaskets, dirty components or system not set up correctly.
First things to check: (Please take the time to check these even if you feel confident it is not the problem before emailing/calling for support)
- NEW SYSTEM - Make sure your overflow jar gasket is in place and overflow jar is seated firmly in place. (The smooth side of gasket should be on jar side) Gasket should be removed and cleaned at least monthly.

|
 |
 |
- ALL-IN-ONE LIDS - Make sure you have BOTH gaskets installed. One in the white portion of the lid and one in the blue filter cap. Also, make sure pour spout plug is seated firmly in the white portion of the lid.
 |
 |
- GAUGE - Make sure to vent gauge to OPEN to ensure an accurate reading.
- Your gauge may look different than the one pictured. Main thing to note is that your gauge is reading 0 before turning it on.

|
|

- DIRTY COMPONENTS:
- All-In-One lid gaskets should be cleaned after EVERY milking.
- OLD SYSTEM - In-Line vacuum filter should be replaced at least monthly. Check if dirty if having pressure issues.

|
 |
- OIL BASED PUMPS - The internal filter may need to be cleaned, watch the video here for complete directions.
- In-Line Milk Filter - Filter needs to be removed and cleaned after EVERY milking, check to make sure it is not clogged.

|
If you are still having issues after checking the previous items, BEFORE emailing/calling us for troubleshooting support, we would like you to perform two baseline tests and one performance test so that we can more quickly help you get your system back up and running. We will ask you for these results. It is important to perform these tests BEFORE looking for solutions.
BASELINE TEST #1


Perform Baseline Test #1: Ideal results are shown in table above, if you have a new system, you can compare your result to the pre-shipping result on the plate on the back of your system. (Elevation can affect results.)
PASSING RESULTS, MOVE TO TEST #2
FAILING RESULTS, CHECK THE FOLLOWING:
- NEW SYSTEM:
- Supply valves not closed or leaking. Make sure supply valve filter is in place and barbed fitting is screwed in tightly. Part #8 and #9 in the system diagram: https://simplepulse.com/pages/diagrams
- Overflow jar either not seated correctly or missing the gasket. Remove jar and make sure gasket is installed correctly and jar is screwed in hand tight. Part #18 and #19 in the system diagram: https://simplepulse.com/pages/diagrams
- Clean air filter or vacuum exhaust filter either not installed or leaking. Verify both filters are installed and both filter housings are secure. Part #11, #12, #14 and #15 in the system diagram: https://simplepulse.com/pages/diagrams
- Connection between vacuum pump and clean air filter, make sure hose is attached and not kinked. Part #13 in the system diagram: https://simplepulse.com/pages/diagrams
- OLD SYSTEM:
- In-Line vacuum filter should be replaced at least monthly. Check if dirty if having pressure issues, replace with section of scotch brite if dirty. Or upgrade to the following product to use in place of this filter. https://simplepulse.com/collections/replacement-components-1/products/filter-housing-float-valve-assembly-old-system
- OIL BASED PUMPS:
- Make sure that you have cleaned the internal filter as mentioned earlier.
- If oil is cloudy, discolored or has debris in it, it will need to be changed. Frequency of oil changes depends on use. Someone who milks 2-3 goats will need to do less maintenance than someone milking 20+ goats. Maintenance is use driven.
- OIL MIST ELIMINATOR:
- Make sure the pinch clamp or shut off valve is completely closed.
- Replace filter if needed. To test if it needs to be replaced, loosen the wing nut on top of the filter, if the pressure improves, replace filter.
- ALL SYSTEMS:
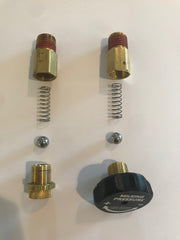
- Regulator, make sure that it is completely closed for the test. This means turned all the way to the + on the new systems or so you don’t see any threads on the older systems. Redo test if regulator was not closed. Part #6 on new system or #3 on older system in the parts diagrams: https://simplepulse.com/pages/diagrams
- Regulator leaking due to dirty or missing parts. Clean internal components (spring and ball) and make sure they are installed correctly according to this picture.
- Vacuum leak or vacuum pump issue.
After checking all of the above items, redo the Baseline Test #1. If it still FAILS, fill out the form below to receive troubleshooting support. Have the test result on hand to provide to us.
ONCE YOU HAVE PASSED BASELINE TEST #1, MOVE TO TEST #2
BASELINE TEST #2
Baseline Test #2 is the same as test #1 with the addition of the pulsator.


Perform Baseline Test #2: Ideal results are shown in table, if you have a new system, you can compare your result to the pre-shipping result on the plate on the back of your system. (Elevation can affect results.)
PASSING RESULTS, MOVE TO PERFORMANCE TEST #3 or #4
FAILING RESULTS, CHECK THE FOLLOWING:
- Pulsator malfunction
- Pulsator not clicking and gauge reads LESS than 8” hg, make sure pulsator is slid all the way back in its slot and firmly seated on the port. Part #3 on new system or #6 on older system in the parts diagrams: https://simplepulse.com/pages/diagrams
- Pulsator not clicking and gauge reads OVER 8” hg:
- Rotate set screw on back of pulsator counter clockwise to increase pulsator speed. Picture on page 17 of new system user manual.
- Rebuild or replace pulsator.
- Pulsing too fast, rotate set screw on back of pulsator clockwise to decrease pulsator speed. Picture on page 17 of new system user manual.
- Clean or replace components.
After checking all of the above items, redo the Baseline Test #2. If it still FAILS, fill out the form below to receive troubleshooting support. Have the test result on hand to provide to us.
ONCE YOU HAVE PASSED BASELINE TEST #2, MOVE TO PERFORMANCE TEST #3 (single system) or #4 (double or cow system)
PERFORMANCE TEST #3 or #4:

Perform Performance Test #3 or #4 depending on how you have your system setup, #3 for single systems, #4 for double or cow systems. Ideal results are shown in table. (Elevation can affect results.)
PASSING RESULTS, EVERYTHING SHOULD BE GOOD TO GO!
FAILING RESULTS, CHECK THE FOLLOWING:
- Check gaskets on All-In-One lids. Refer to the following diagram: https://simplepulse.com/pages/diagrams Make sure gaskets #2 and #5 are clean, installed and fully seated in the lid. Also check part #3, the pour spout plug, it should be firmly installed in the lid.
- Verify milk lines, pulsator lines and supply lines are all attached at proper locations.
- If you are only using one lineset, make sure that you have a pulsator plug on the other port of the pulsator and on the new system, only the supply valve you are using in the Open position.
- If linking two jars together, ensure this is done correctly, refer to page 15 in the new system user manual.
- Hole or crack in Y connector(s), visually inspect and replace if needed.
- Hole or crack in inflation shell, visually inspect and replace if needed.
- Tear in inflation liner, visually inspect and replace if needed.
- Claw malfunction:
- Disassemble and reassemble referring to diagram: https://simplepulse.com/pages/diagrams
- Visually inspect parts and replace as needed. Claw components should be deep cleaned at least once a week. The most common items to need replaced due to use in the claws is the diaphragm and gasket, parts #4 and #6.
- Make sure claw lower screw, part #7, https://simplepulse.com/pages/diagrams, is not screwed on too tight.
- In-Line Milk Filter - Filter needs to be removed and cleaned after EVERY milking, check to make sure it is not clogged.
- 4 CFM SYSTEM:
- System works best with one set of lines (2 teats) and jars. Do not try to attempt to milk 2 goats/sheep at once. If you are using the bucket, do not also use the in-line milk filter.
SimplePULSE does not have fees for troubleshooting support.
Please email sales@simplepulse.com or call 844 64 PULSE.
{formbuilder:40612}